Dialsink Gage | Di-Angle Gage | Chamfer Gage |
Countersink Gage | Chamfer Inspection
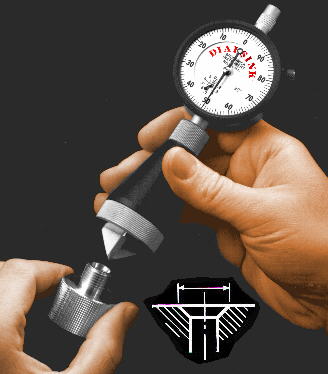
The DIALSINK gage is unsurpassed for fast, accurate measurement of diameters at the top of tapered holes. Countersinks, chamfers, center drilled holes, valve seats, etc., can all be quickly measured to within .001". Such holes may be found in castings, stampings, shafts, spindles, gears and many types of screw machined parts.
The Dialsink is easy to use. Simply insert the three blade plunger into the hole, press the Dialsink firmly against the part with a slight twisting motion, and read the diameter directly to three decimal places on the dial face. No setting master is necessary. Each unit, after calibration in our factory with a set of precision standards, is assigned a "SET TO" number. When the base of the gage is pressed against any smooth, fiat surface, the outer dial of the indicator can be set to read the "SET TO" number stamped into the indicator back.
The Dialsink is available in two angular ranges and five diameter capacities. Use the 0-90 degree Dialsink if the total included angle of the hole is 90 degrees or less. If the angle is between 90 and 127 degrees use the 127 degree Dialsink. 0-90 degree models are guaranteed accurate within +/-.001". 90-127 degree models are rated at +/-.002". The 0-1/2" models are especially small and light. They have been specifically designed for tapers, countersinks and chamfers in the ends of tiny screw machine parts.
Dialsink gages are built rugged to withstand constant use on production lines or at the machine. The plunger and base plate components are made of hardened, chrome plated, alloy steel and only the finest American made dial indicators are used. They are equally well suited to inspection departments, gage labs and receiving inspection areas. Brunswick originated the Dialsink type gage over forty years ago and has manufactured thousands of them ever since.
| Model | Diameter range | Angle range |
|---|---|---|
| BRE.5090 | 0-1/2" | 0-90 |
| BRE.1090 | 0-1" | 0-90 |
| BRE.2090 | 1-2" | 0-90 |
| BRE.3090 | 2-3" | 0-90 |
| BRE.4090 | 3-4" | 0-90 |
| Model | Diameter range | Angle range |
|---|---|---|
| BRE.5127 | 0-1/2" | 90-127 |
| BRE.1127 | 0-1" | 90-127 |
| BRE.2127 | 1-2" | 90-127 |
| BRE.3127 | 2-3" | 90-127 |
| BRE.4127 | 3-4" | 90-127 |
DIALSINK OPTIONS

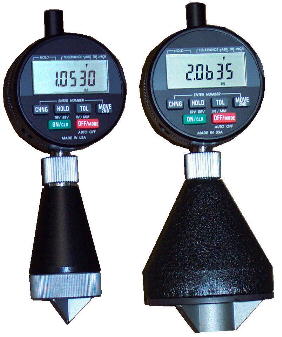
DIGITAL ELECTRONIC INDICATORS - Dialsink gages are available with digital electronic indicators to provide finer measurement resolution, inch / metric conversion, reading hold modes and the ability to set "zero" for comparative measurements. Add "D" prefix to model number when ordering.
CARBIDE FACED PLUNGERS - Improved wear resistance is available with optional carbide faced plungers. Add "-CF" suffix to model number when ordering.
METRIC READING INDICATORS - Dialsink gages can be supplied to read in .01 mm increments. Add -M" suffix to model number when ordering.
DIALSINK TYPE O.D.
The Dialsink OD is designed to measure the small end diameter of male tapered shafts. The same principle of the standard Dialsink
is inverted to enable fast, accurate measurement of external tapers.
| Model | Diameter range | Angle range |
|---|---|---|
| BRE.0D1090 | 3/16 - 1" | 0-90 |
| BRE.0D2090 | 1-2" | 0-90 |
| BRE.0D3090 | 2-3" | 0-90 |
| Model | Diameter range | Angle range |
|---|---|---|
| BRE.0D1127 | 3/16 - 1" | 90-127 |
| BRE.0D2127 | 1-2" | 90-127 |
| BRE.0D3127 | 2-3" | 90-127 |
Add "M" suffix to model number when ordering metric indicators. Add "D" prefix to model number when ordering digital indicators.
DIALSINK 60
The Dialsink 60 is specifically designed for measuring the depth of center drilled holes. The 60 degree plunger duplicates the
way in which a 60 degree machine center would seat in the part. Whenever center drill depths must be held constant to control a
subsequent operation (like grinding shoulder lengths) the Dialsink 60 provides a quick and easy method of checking or sorting.
| Model | Diameter Range | Angle |
|---|---|---|
| BRE.1060 | 040" - .550" | 60 Only |
Add "M" suffix to model number when ordering metric indicators. Add "D" prefix to model number when ordering digital indicators.
DI-ANGLE GAGE
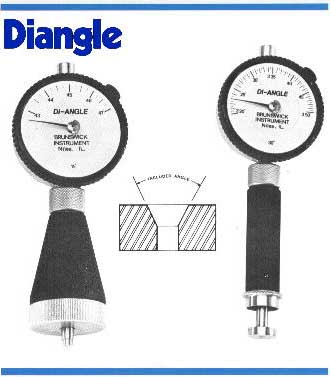
The DIANGLE gage is used to measure the included angle of either tapered holes or tapered shafts.
The construction of the DIANGLE consists of an inner and an outer plunger, which contact the taper. The difference between the radii of the inner and outer plungers is one dimension of a 90 degree triangle. The axial movement of the plungers is tracked by a dial indicator which gives the second dimension of the 90 degree triangle. Knowing these two dimensions enables the DIANGLE to read the total included angle directly in degrees. DIANGLE gages can be used to measure tapers with a major diameter as small as .100 or as large as 6 inches.
DIANGLES are custom manufactured for your specific application. Standard components are modified and calibrated to suit each requirement. Ranges of the total indicator reading can be as small as several minutes (for finer sensitivity and accuracy) or as large as 120 degrees. The accuracy of the DIANGLE is dependent upon the range desired. For an instrument with a range of several minutes, guaranteed accuracy to +/-10 seconds is attainable. A tapered master gage (ground and certified) is recommended for calibration of the DIANGLE. For an immediate quotation on individual DI-ANGLE gage or gage sets, please send a marked up blue print specifying the dimension(s) to be gaged.