Tap Sizes
Tap Sizes have been standardized to conform with those of standard screws, bolts, and studs. Machine Screw tap sizes range from No. 0 through No. 14; No. 0 being .0600" outside diameter; No. 1, .0730"; No. 2, .0860, etc.--all in .0130 increments. Hand Taps, more commonly designated as Fractional Taps and used today on all production machines, are designated in fractional and integral inch sizes from 1/4" upwards.
Threads per Inch are shown for various tooth forms: the Unified series adopted by Great Britain and the United States during the war, and the corresponding American National Standard. NC and UNC mean coarse thread. NF and UNF mean fine thread. NS means special thread.
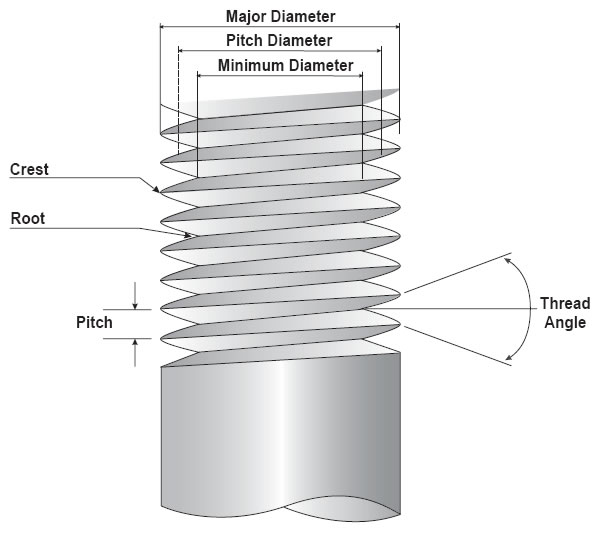
Pitch Diameter is the basic dimension of a screw, threaded hole, or a tap the diameter of an imaginary cylinder, the surface of which passes through the thread where width of thread and space between threads are identical. This cylinder, of course, would be a cone for tapered taps. It is upon Pitch Diameter that tolerance limits are based to establish Class of Thread.
What is the difference between NC and NF ( National Coarse and National Fine ) thread?
The difference between NC and NF is the pitch.
Pitch is the distance between the crests of each thread. (See Image Below)
Coarse threads have a larger pitch ( fewer threads per inch, or a bigger distance between the threads) compared to fine threads.The pitch can be found by looking at a chart for either NC or NF and changes depending on the diameter. (See tables below)
NC (National Coarse) and UNC (Unified National Coarse) are the same. NF (National Fine) and UNF (Unified National Fine) are the same
| NC ( National Coarse ) | |
| Size ( Diameter ) | Threads per Inch |
| 1/4" | 20 |
| 5/16" | 18 |
| 3/8" | 16 |
| 7/16" | 14 |
| 1/2" | 13 |
| 9/16" | 12 |
| 5/8" | 11 |
| 3/4" | 10 |
| 7/8" | 9 |
| 1" | 8 |
| 1-1/8" | 7 |
| 1-1/4" | 7 |
| 1-3/8" | 6 |
| 1-1/2" | 6 |
| NF ( National Fine ) | |
| Size ( Diameter ) | Threads per Inch |
| 1/4" | 28 |
| 5/16" | 24 |
| 3/8" | 24 |
| 7/16" | 20 |
| 1/2" | 20 |
| 9/16" | 18 |
| 5/8" | 18 |
| 3/4" | 16 |
| 7/8" | 14 |
| 1" | 12 |
| 1-1/8" | 12 |
| 1-1/4" | 12 |
| 1-3/8" | 12 |
| 1-1/2" | 12 |

Class Of Thread
There are three established Classes of Thread, designated in the Unified series by adding “A” for screws and “B” for nuts (or other internal threads) to show definite limits and tolerances. |
Class 2B Thread consists of a 2A screw in a 2B hole. This 2B Thread has wide application, accommodates plating, finishes, and coating to a limited extent and, therefore, has fair tolerance allowances. |
GH Numbers
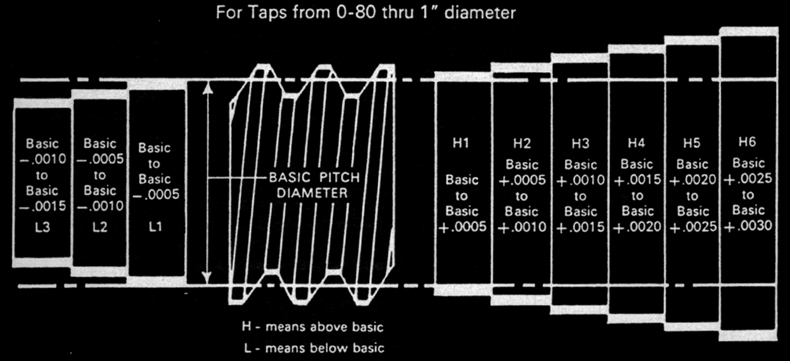
In the tables that follow, tap selections are shown for the Class of Thread desired and, under the Class of Thread heading, applicable GH Numbers are listed. "G” designates Ground Thread. “H” means that pitch diameter is on the high side of basic. These two letters are followed by a numeral showing the tolerance of pitch diameter oversize as follows: |
The diagram below, exaggerated for clarity, illustrates these several selectives in Pitch Diameter tolerance--including "L" (undersize tolerance), although no "L" taps are shown in this book. Pitch Diameter varies with the number of threads per inch because the number of threads of Pitch of screw determines the height of thread. Since Basic Pitch Diameter is measured from points half the height of the fully formed thread, a hole drilled to provide theoretical 50% thread engagement would be of the same diameter as the pitch diameter of the tap. |

handy tip for H limits
decimal over size x 2 plus 1 = H limit
eg
.005 oversize
.005 x 2 plus 1 = H11
eg.
.003 oversize.
.003 x 2 plus 1 = H7
The Basic Point In Thread Measurement
All measurements must have a controlling point or base from which to start. In the case of a screw thread, this control point is called the BASIC or theoretically correct size, which is calculated on the basis of a full form thread. Thus, on a given screw thread, we have the Basic Major Diameter, the Basic Pitch Diameter and Basic Minor Diameter. |
For graphic representation, the Basic Pitch Diameter is commonly designated by a line with variations from it indicated by shorter lines spaced to represent a numerical scale, as shown on the left half of the drawing below. |
| Constants For Finding Pitch Diameter And Minor Diameter Of Screw Threads | |||||||
|---|---|---|---|---|---|---|---|
|
Constants
for Finding Basic Pitch Diameter |
Constants
for Finding Basic Minor Diameter |
||||||
|
|
|
|
|||||
|
Threads Per Inch |
Pitch In Inches |
National Thread |
Whitworth Thread |
Theoretical V |
National Thread |
Whitworth Thread |
Theoretical V |
|
80 72 64 60 56 50 48 44 40 36 32 30 28 27 26 24 22 20 18 16 14 13 12 11-1/2 11 10 9 8 7 6 5-1/2 5 4-1/2 4 3-1/2 3-1/4 3 |
0.012500 0.013888 0.015625 0.016666 0.017857 0.020000 0.020833 0.022727 0.025000 0.027777 0.031250 0.033333 0.035714 0.035461 0.037037 0.041666 0.045454 0.050000 0.055555 0.062500 0.071428 0.076923 0.083333 0.086956 0.090909 0.010000 0.111111 0.125000 0.142857 0.166666 0.181818 0.200000 0.222222 0.250000 0.285711 0.307692 0.333333 |
0.00812 0.00902 0.01015 0.01083 0.01160 0.01299 0.01353 0.01476 0.01624 0.01804 0.02030 0.02165 0.02320 0.02406 0.02498 0.02706 0.02952 0.03248 0.03608 0.04059 0.04639 0.04996 0.05413 0.05648 0.05905 0.06495 0.07217 0.08119 0.09279 0.10825 0.11809 0.12990 0.14434 0.16238 0.18558 0.19985 0.21651 |
0.00800 0.00889 0.01000 0.01067 0.01144 0.01281 0.01334 0.01455 0.01601 0.01779 0.02001 0.02134 0.02287 0.02372 0.02463 0.02668 0.02911 0.03202 0.03557 0.04002 0.04574 0.04926 0.05336 0.05568 0.05821 0.06403 0.07115 0.08004 0.09148 0.10672 0.11642 0.12807 0.14230 0.16008 0.18295 0.19702 0.21344 |
0.01083 0.01203 0.01353 0.01443 0.01546 0.01732 0.01804 0.01968 0.02165 0.02406 0.02706 0.02887 0.03093 0.03208 0.03331 0.03608 0.03936 0.04330 0.04811 0.05413 0.06186 0.06662 0.07217 0.07531 0.07873 0.08660 0.09623 0.10825 0.12372 0.14434 0.15746 0.17321 0.19245 0.21651 0.24744 0.26647 0.28868 |
0.01624 0.01804 0.02030 0.02165 0.02320 0.02598 0.02706 0.02952 0.03248 0.03608 0.04059 0.04330 0.04639 0.04812 0.04996 0.05413 0.05905 0.06495 0.07217 0.08119 0.09279 0.09993 0.10825 0.11296 0.11809 0.12990 0.14434 0.16238 0.18558 0.21651 0.23619 0.25981 0.28868 0.32479 0.37115 0.39970 0.43301 |
0.01601 0.01786 0.02001 0.02134 0.02286 0.02562 0.02668 0.02910 0.03202 0.03558 0.04002 0.04268 0.04574 0.04742 0.04926 0.05336 0.05821 0.06403 0.07114 0.08004 0.09147 0.09851 0.10672 0.11132 0.11642 0.12806 0.14230 0.16008 0.18295 0.21344 0.23284 0.25613 0.28458 0.32017 0.36590 0.39404 0.42689 |
0.02165 0.02406 0.02706 0.02887 0.03093 0.03464 0.03608 0.03936 0.04330 0.04811 0.05413 0.05773 0.06186 0.06416 0.06662 0.07217 0.07873 0.08660 0.09623 0.10825 0.12372 0.13323 0.14434 0.15062 0.15746 0.17321 0.19245 0.21651 0.24744 0.28868 0.31492 0.34641 0.38490 0.43301 0.49487 0.53294 0.57733 |

Thread Constants For Various Percentages
Formula for Obtaining Tap Drill Sizes
(Select nearest commercial stock drill)
(Outside Diameter of Thread) - (0.01299 X Amount of Percentage of Full Thread / Number of Threads per Inch) =
Drilled Hole Size
(Number of Threads per Inch) X (Outside Diameter of Thread - Selected Drill Diameter / 0.01299) =
Percentage of Full Thread
Figures in table show amount to subtract from O.D. of screw to obtain specific percentages of thread.
|
Threads Per Inch |
Double Depth |
60% Thread |
65% Thread |
70% Thread |
75% Thread |
80% Thread |
85% Thread |
|
6 7 8 9 10 11 12 13 14 16 18 20 24 27 28 30 32 36 40 44 48 56 64 72 80 |
0.21651 0.18558 0.16238 0.14434 0.12990 0.11809 0.10825 0.09992 0.09278 0.08119 0.07217 0.06495 0.05412 0.04811 0.04639 0.04330 0.04059 0.03608 0.03247 0.02952 0.02706 0.02319 0.02029 0.01804 0.01623 |
0.1300 0.1114 0.0975 0.0866 0.0779 0.0708 0.0649 0.0599 0.0556 0.0486 0.0431 0.0389 0.0326 0.0288 0.0276 0.0260 0.0243 0.0216 0.0194 0.0177 0.0161 0.0138 0.0121 0.0107 0.0097 |
0.1408 0.1207 0.1056 0.0939 0.0844 0.0767 0.0702 0.0649 0.0602 0.0526 0.0466 0.0421 0.0354 0.0312 0.0298 0.0282 0.0263 0.0234 0.0210 0.0192 0.0174 0.0149 0.0131 0.0115 0.0105 |
0.1517 0.1300 0.1138 0.1011 0.0909 0.0826 0.0755 0.0699 0.0648 0.0566 0.0501 0.0453 0.0382 0.0336 0.0324 0.0304 0.0283 0.0252 0.0226 0.0207 0.0187 0.0160 0.0141 0.0123 0.0113 |
0.1625 0.1393 0.1219 0.1083 0.0974 0.0885 0.0808 0.0749 0.0694 0.0606 0.0536 0.0485 0.0410 0.0360 0.0347 0.0326 0.0303 0.0270 0.0242 0.0222 0.0200 0.0171 0.0151 0.0131 0.0121 |
0.1733 0.1486 0.1300 0.1156 0.1039 0.0944 0.0861 0.0799 0.0740 0.0646 0.0571 0.0517 0.0438 0.0384 0.0370 0.0348 0.0323 0.0288 0.0258 0.0237 0.0213 0.0182 0.0161 0.0139 0.0129 |
0.1842 0.1579 0.1381 0.1228 0.1105 0.1005 0.0921 0.0850 0.0789 0.0691 0.0614 0.0553 0.0460 0.0409 0.0395 0.0368 0.0345 0.0307 0.0276 0.0251 0.0230 0.0197 0.0173 0.0153 0.0138 |
Relation Of Tap Pitch Diameter To Basic Pitch Diameter
American tap manufacturers use a series of tap pitch diameter limits. These limits feature a .0005” tolerance in tap sizes #0 through 1 inch, and a .001 inch or greater tolerance in tap sizes above 1 inch through 1-1/2 inch diameter, inclusive. The chart shows the relationship between tap pitch diameter limits and basic (nominal) pitch diameter.

Tap Limits Product Limits And Class Of Thread
Engineers frequently receive a request for a Class 3B (or other class) tap. Many times, too, the customer will ask for a tap to produce a “Class 3B Fit”. Ordering taps by these specifications is incorrect, and often impractical. The following information is presented to clarify the difference between the terms Class of Thread, Tap Limits and Product Limits to make ordering taps easier and aid the customer in obtaining the tap best suited for his requirements. |
To summarize, the following points should be remembered: |
| link to Tap Recommendations for Classes of Thread for Unified and American National Screw Threads |

Metric Tap Tolerances
Tapping hole tolerances
| ISO | DIN | ANSIBS | Tolerance, internal thread (nut) | Application |
| ISO 1 | 4H | 3B | 4 H 5 H | Fit without allowance |
| ISO 2 | 6H | 2B | 4 G 5 G 6 H | Normal fit |
| ISO 3 | 6G | 1B | 6 G 7 H 8 H | Fit with large allowance |
| - | 7G | - | 7 G 8 G | Loose fit for following treatment or coating |
Tap tolerance vs. tolerance on internal thread (nut)
Normal tap tolerance is ISO 2 (6H), which generates an average quality fit between screw thread and nut. Lower tolerance (ISO 1) generates a fine fit without a gap on the flanks between screw thread and nut. Higher tolerance (ISO 3) generates a rough fit with a large gap. This is used if the nut is coated, or if a loose fit is preferred. Between tolerances 6H (ISO2) and 6G (ISO3), and between 6G and 7G, there are also taps with tolerance 6HX and 6GX. “X” means the tolerance is outside the standard and is used for taps working with high strength or abrasive materials such as cast iron. These materials do not cause oversize problems so higher tapping hole tolerance can be used in order to increase tool life. The tolerance width is equal between 6H and 6HX. Forming taps are usually produced with a 6HX or 6GX tolerance.
Din Tolerances

 |
Thread tolerance classes Tap tolerances zones |
ANSI Tolerances


| Thread tolerance classes Tap tolerances zones |
